It’s easy to get excited about the idea of growing plants and breeding fish at the same time. After all, it’s a surprisingly effective way to reduce your food bill and even do your bit to help the environment.
You can probably imagine the feeling you’ll get when you harvest your first plant or pop one of your own fish in the oven. But, there is a lot more to a successful aquaponics system than simply adding some fish to water and then pumping the water around the plants.
That’s why this guide to creating an IBC Tote Aquaponics system is here. This is a great introduction to aquaponics and an affordable way to get started. There’s a good reason why choosing a budget-friendly system makes sense. As you’re knowledge and experience grows you’ll want to experiment with different techniques; this type of system will allow you to do that without breaking the bank.
The IBC Tote
The most important part of your aquaponics system is having the right container for the job. You’ll need a container for your fish and at least one for your plants. Fortunately, you can use one IBC tote to do both parts the fish tank and the grow bed. The top third can be cut off the IBC tote and flipped to make the perfect grow bed.
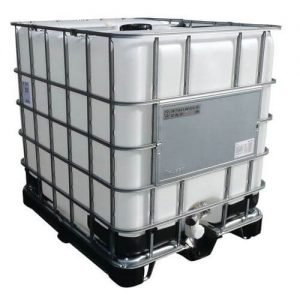
IBC is simply an abbreviation for Intermediate Bulk Container. In short, this is any container that is designed to hold large quantities of liquid.
The average IBC tote is made of a semi-clear plastic that sits inside a metal frame. They are very sturdy but in order to minimize algae growth in your fish tank, it will be important to spray the outside of your IBC tote so no light comes through.
You can purchase a new IBC or there are usually plenty of examples available from places like eBay, Craigslist or even at a local store that uses IBC totes and no longer needs them.
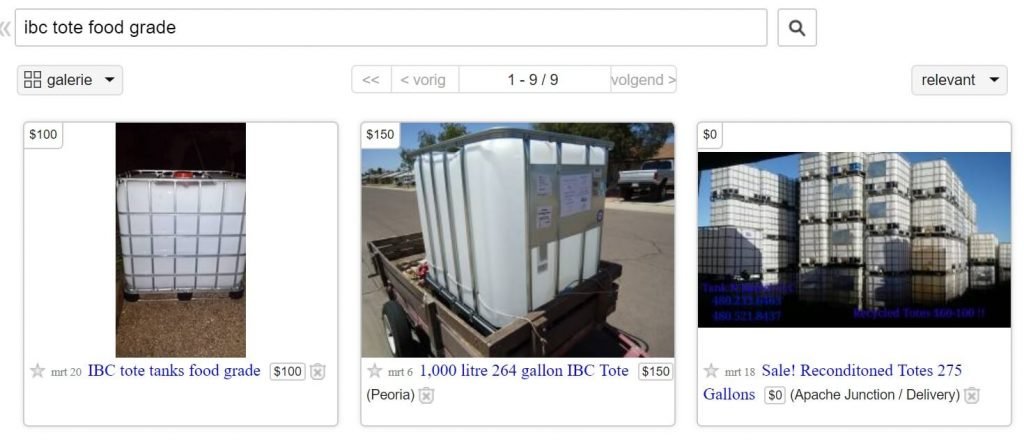
However, if you’re recycling an IBC Tote then it is essential that you make sure it is food graded. You’ll also need to ensure it is properly cleaned; you don’t want trace elements that contaminate your water and potentially killing your fish or plants. Of course, this shouldn’t be an issue if you used a food graded IBC tote but it is better to play safe.
The most effective way to do this is to rinse the container with your hose to flush out any remaining liquids. You can then either refill the tank with water and standard dish detergent. Leave it for five minutes before flushing out again; ensuring there are no soap suds coming out.
However, if you’ve decided to cut the top off your IBC tote then you can scrub the inside by hand with standard dish detergent. Again you’ll need to flush it to ensure it is completely free of chemicals and soap.
Perhaps the best thing about the IBC tote is that it will allow you to choose virtually any type of aquaponics set up. However, for your first experience, it is probably best to create a standard flood and drain aquaponics system.
What You’ll Need
To make the setup process as simple as possible you need to have all the right materials and tools ready from the start. Here’s what you’ll need to get you started.
- IBC Tote Container
This is the container for your fish and the plants; as you’ll discover in the next section. The standard IBC tote is 250 gallons which will give you 150 gallons of water for your fish; this is perfect for the aquaponics beginner.
- Saw
You’re going to need to cut your IBC tote. A hand saw or any type of power saw is essential for this part of the job. You’ll also need a file and/or sandpaper to ensure there are no sharp edges after you’ve cut the IBC tote.
- Drill
The tanks need to be connected with pipes; the ideal pipe size is 1 inch in diameter. You’ll need to drill holes into your containers. It’s a good idea to have the right size drill bit before you start. In fact, the hole should be created with a hole saw; you need one that is 1 ¼”; this will be perfect for your Bell Siphon or U siphon.
- Growing media
There are several different types of growing media for you to choose from.
River rock is one of the best as it is large enough to slow water drainage and encourage bacteria growth.
Lava rock is great but is rough on the hands.
Gravel – this is the cheapest but has poor drainage and is not great at encouraging bacteria growth; it is vital for the survival of your plants and fish.
Clay pebbles are pH neutral, won’t degrade and provide a really good base for your plants. This is the best-growing media and great for beginners. If this is too expensive, try river rock.
- Water pump
You need a water pump that is capable of moving the water from your fish tank to the growing bed. It doesn’t matter which type of setup you want to use the pump should be capable of removing all the water in the fish tank once every hour. This will ensure all the water is cleaned properly which is essential for the health of your fish tank and will provide enough nutrients to your plants. For a 250-gallon IBC tote, this means you need a pump capable of moving 150 gallons of water in an hour.
You will need to consider its lifting capabilities as the water is going up from the fish tank to the grow bed which could be significantly higher. That’s why it’s not a bad idea to use a factor of 1.5. In case of a 150 gallons fish tank, you will need to use a pump with a minimum rate of 225 gallons/hour.
- Air pump
Fish need oxygen in the water to breathe and stay alive. While the system may provide enough oxygen it is safer to add a small air pump. The size of this will be dictated by the number of gallons in your fish tank.
The size of your aquaponics air pump can be calculated by working out the likely oxygen demand. For a standard IBC tote, you’re going to have between 15 and 30 1 pound fish. That’s the worst case scenario of 30 pounds of fish. That’s 13kg.
Multiply this by 800mg to get 10.4 grams per hour. You should add an extra gram to allow for oxygen used in the processing of food.
Total oxygen demand equates to 11.4 grams per hour.
To turn this into a pump size you’ll need to divide 450g by the 11.4 above; equaling 39.
750 watts of power / 39 = 19 watts
Multiply this by 90 to get 1710 liters per hour.
Divide by 60 and your pump needs to move 28.5 liters per minute.
Your air pump needs to be capable of adding this much oxygen to the water every minute; this will ensure the fish have all the oxygen they need even if the water pump fails.
It’s a good idea to add an air stone to your tank as this will break up the bubbles from the air pump into smaller bubbles; increasing the amount of oxygen in the water.
However, if you oversize your water pump, you can use a split flow to put some back in the fish tank, creating more air.
- Filter
The waste from your fish is turned into nitrates for the plants with the aid of naturally occurring bacteria. However, there will always be larger pieces of waste and debris that could block up the water pipes in your system.
To prevent this you need to invest in a swirl water filter. These are very simple. You simply need a barrel with a basket inside. The water enters from the fish tank and swirl round; it then exits at a slightly higher point to go to the plant beds. Large particles drop to the bottom of the barrel and can be removed later.
This prevents the waste and debris from building up in the pipes and causing a blockage.
Blocked water pipes can cause the failure of your system surprisingly quickly.
This is for information only. You won’t need a filter in the IBC tote set up, but you will need one if you’re planning to set up a much bigger system in the future. The more fish you have the greater the need for a filter.
- Plastic pipes
If using an IBC tote setup you’ll need a pipe of 1 inch; this means using a reducer. This will carry the water from your fish tank to your grow bed. Because the grow bed is situated over the fish tank, the bell siphon can be positioned to ensure that water is deposited straight out of the bottom of the grow bed and back into the fish tank.
- pH testing kit
Once you get the system established you’ll need to ensure the pH level is right for your fish and plants. This is something that you’ll need to do on a regular basis. A simple pH testing kit will help you to verify this.
Of course, pH is not the only thing you’ll need to test. It is also important to pick up testing kits for ammonia, nitrites, nitrates and to monitor the temperature. This will help to ensure the fish and the plants have the best possible atmosphere to grow in.
- Your fish & plants
Finally, you need to choose the fish and plants to add to your system; you can’t get a crop without these! It is worth taking a moment to consider your preferred fish and plant type before you get started as this will affect several elements of your build.
You should also be aware that if you are hoping to look after tropical fish and you live in a cooler climate you’ll need a water heater.
Finally, a grow light may help your plants to grow; especially if the light level is low or if you are growing indoors. But artificial light should be kept away from your fish as much as possible; it will encourage algae growth which is not beneficial to your system.
 I have written a book that contains all the information you need to get started with aquaponics.
Don’t be the person that makes painful mistakes during your first aquaponics build!
It has 265 pages filled with information about aquaponics. It’s available in paperback or eBook format.
You can buy it here on Amazon.com
Choosing Fish & Plants
Before you can actually start your system you need to decide what fish you are hoping to keep and what plants you want to start growing. You’ll need to consider what the climate is like where you live.
It is just as important to know how many fish you want to keep and how many plants you want to grow. The two elements are directly related; knowing one will not only give you the other it will also tell you the size of the container you need.
Some of the most common fish options are:
This is perhaps the most popular choice because it is very tolerant of temperature and pH levels. This makes it a great choice for your first system as it will be the most forgiving.
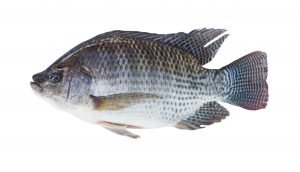
Tilapia prefers water temperatures between 60 and 75 degrees Fahrenheit. They are also very tolerant of other fish and don’t feed on their own young.
Interestingly the taste of these fish is mild. A factor that is contributing to their increased popularity in restaurants.
There are several different types of catfish but the Channel Catfish is one of the most popular for many commercial setups. They are also very hardy and accommodating with system variances. They prefer warm water, between 60 and 70° although they can survive as low as 55°. They are surprisingly resistant to parasites and bacteria that can often occur in small tank systems.
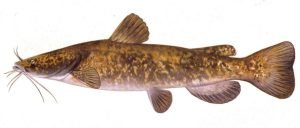
However, it is worth noting that they prefer the bottom of the tank; this means you won’t be able to stock as many in the space as you would with other breeds.
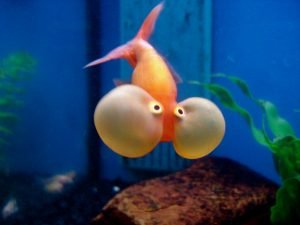
These are not commonly eaten but they are very good at tolerating the changes in a new aquaponics system. This makes them the best choice for new systems where you don’t want to eat the fish.
Having said that, they can be eaten and, if cooked properly, can be quite delicious.
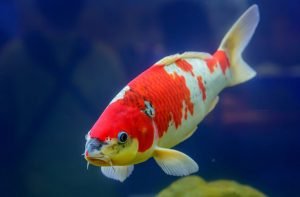
This is the cousin of the carp and they are not generally eaten. They are more attractive to look at that many of the other options and are very hardy. This makes them another good choice if you’re not planning to eat the fish in your system.
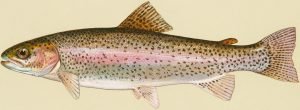
The trout is a great tasting fish but this is not the one for beginners; it is more difficult to raise successfully in an aquaponics system. This is because they prefer colder water (circa 55°). Colder water is likely to hinder the growth of vegetables, particularly lettuce, tomatoes, and cucumbers; which are all common first crops.
Stocking Levels
The fish produce the waste that is converted to nitrates by bacteria. The nitrates feed the plants which clean the water and return it to the fish; keeping them healthy.
However, if you don’t have enough fish the plants won’t have enough nutrients to grow properly. Too many fish and the plants won’t be able to clean the water effectively; leaving the fish swimming in dirty water which could kill them.
In practice this means a 150 gallon IBC tote would accommodate 18 fish; assuming they weigh between 1 pound when fully grown.
An alternative way of looking at this is to consider how many plants you would like to grow. We then look at how many square feet of growing area you have. Then calculate how many pounds of feed we need for that area to be supplied with nitrate and then on that amount of feed we calculate the amount of fish we need. This is quite complex to explain here, but everything is explained in my book.
It is essential to use their adult weight in these calculations even if you intend to stock your system with baby fish. If you don’t they will grow and overcrowd your tank!
It is quite possible to expand your setup in the future or to have a separate one; don’t be afraid to start small and learn the ropes first.
Read my article about fish to plant ratio in aquaponics.
Setting Up Your System
You’re finally ready to put your aquaponics system together. This should be easy as you’ve got the equipment and tools you need and made all the decisions already:
- Finding an IBC Tote
- Choosing the location
- Selecting your growing media
- Finding the right fish
- Deciding on the plants
- Purchasing a suitable pump
- Buying a water testing kit
Step 1 – Cut Your IBC
- The first step in creating your IBC tote aquaponics set up is to remove the steel cage from round the tote. This can be done by unbolting the bars on the top and removing them; the tote should lift straight out.
- Re-bolt the bars to the top of the cage; they will be useful for holding your grow bed in place later.
- You can then remove the bolts attaching the cage to the base
- Measure 12 inches down from the top of the cage; this should place you below the first square hole.
- You can then cut the cage at this height all the way around. You may be able to use wire cutters, a reciprocating saw or a hack saw to do this but the best idea is to use an angle grinder.
- Once done you’ll have the base of the cage in your hand; it will be just one square high.
- Don’t forget to file the edges to ensure they are smooth and cover them with something to prevent them from rusting.
- You can now cut the top of your IBC tote. Start by measuring 14 inches from the top of the plastic tote; this will give you room for 12 inches of growing media and a dry space above. The dry space is important for reducing the risk of algae growth. You’ll probably find it easiest to use a jigsaw.
- Clean up the edges with a file; you don’t want the plastic dropping into your system once you have it set up.
- Finally, you’ll see a metal valve cover flap on the front of the cage. You can unscrew this. Then measure 12 inches to the left side of where the valve cover was and remove this part of the cage. Repeat on the right. This will give you a gap running for three-quarters of the width of the top of the metal cage. Once you set the grow tank on this gap, it will be essential for accessing the fish easily.
Step 2 – Choose The Location
Now it is a really good time to choose your location. You need to consider how much sun it will get and how easily you can get to the system. It is possible to house this inside a greenhouse or something similar. You can set this up inside your home if you wish but you’ll need to be mindful of the space it takes up and be prepared in case you have any leaks.
Once you’ve chosen the location you’ll need to bolt the metal cage back to the base and put it in position. It is important to make sure the tank is on a level surface. It’s not a good idea to remove the valve from the bottom of your IBC tote. However, leaving it exposed does mean that someone could accidentally turn the valve; letting all the water out of your system.
To prevent this it’s a good idea to use the valve cover plate and screw it into the cage; covering the valve completely.
Step 3 –Setting Up Your Tank
Like previously mentioned, your IBC should be food graded but it is still a good idea to give it a good wash and rinse before you start to set the system up. Now is the best time to do this.
Position your fish tank inside its metal cage in your desired locationYou’ll need to lay two pieces of wood across the top of it; this should be strong 2 x 4 that is not rotten. This will give the grow bed the support it needs. Simply resting it on the fish tank could cause it to sag and damage the entire system.
The front edge of the grow bed should be sat over the front piece of wood and the rear of the grow bed will be overhanging the back of the fish tank cage. This is to allow you to see and access the fish as needed. The cross bars that you put back on the cage will help to spread the weight of the grow bed evenly.
It is worth noting that the top of the IBC tote has a screw lid which may have a pressure release valve in it. This shouldn’t present a problem; just make sure the lid is tight before you put the grow bed in position.
If you prefer to play safe then cut the pressure valve out and use silicone sealant to seal the gap.
Should you be unhappy with the height of your grow bed you can remove some of the metal from the bottom of the cage; reducing the height of the grow bed. Of course, you’ll need to cut the fish tank part of the IBC tote to ensure it stays inside the cage.
You need to paint the fish tank or cover it to ensure that the sunlight can’t get into the tank and cause algae to build up.
Step 4 – Water Pump
The pump sends the water up from the fish tank into the grow bed. Any aquarium pump or water pump will do as long as it can move at least 225gallons of water every hour. It is a good idea to have a float in it which ensures it switches off if the water level gets too low. You will also need to position the pump at least a foot off the base of the tank. If the pump should switch off thanks to low water levels at least the fish will still have some water to swim in until you fix the issue.
Alongside the water pump, you’ll need reinforced kink free pipe; this will be connected to the pump with the help of a reducer. These are commonly supplied with the pump but can be easily found at your local store if needed.
You’ll also need some T fittings and 2 taps which can be got from any hardware store. If you wish you can clamp the hoses on with stainless steel clamps to hold the hoses in place.
Top Tip: Hot water will help to soften the kink free plastic pipes to allow them to slide on the joints.
Now place the pump in the base of your fish tank. Run your pipe up and out of the fish tank and into a T fitting.
One side of the T fitting should be fitted with one of your taps; this will allow excess water to flow back into the fish tank and effectively act as an aerator as well as relieving the pressure of an oversized water pump. As well as providing air for the fish this will be used to ensure the flow rate is right for the Bell siphon to work properly.
The other junction of the T has a second piece of pipe that makes its way to the grow bed. It is best to zip tie it to the cage; this will prevent any issues when it is under pressure.
At the top, before it goes into the grow bed you can add the second valve. This will allow you to turn the pump off if you need to in order to clean the grow bed. The alternative is to direct the water through another pipe at this valve and straight back to the fish tank; bypassing the grow beds. This would only be for a short time while you clean the grow beds; if you need to.
The pipe should end in one or two 90° bends that allow it to comfortably rest on the top of the grow bed. The water will then flow up the pipes and drop down onto the grow media; ideally, this should be in one corner of the grow bed while the Bell siphon is at the other end. This will make sure the water flows through the entire grow bed.
Step 5 – Adding A Bell Siphon
Now the water can get into your grow bed you need to make sure it can get back into your fish tank. Using a Bell siphon means that the system will look after itself; the beds will naturally flood and drain.
The Bell siphon consists of an outer cover with small slits to keep media out but water in. There is an end cap that helps to make sure it is secure in the grow bed. You’ll also need a top cap; you can cut two sections out of the side of the top cap. This will still allow it to sit loosely in place but allow water through. The gaps will be too small to allow debris into the siphon set up. Debris is not good as it can cause blockages preventing the water from moving around your system.
The most important part of the siphon is a standpipe; this prevents the water from draining into the fish tank until it reaches the top of the pipe. The pipe should be 10 inches deep; this will ensure the water never reaches the top of the grow bed and prevents algae build up.
You’ll now need to create a hole in the base of your grow bed. This should be the same dimensions as your standpipe. There should be a bulkhead fitting which will give you the exact dimensions of the hole you need.
Position this fairly near the side opposite the water entry pipe; you can cut the hole with a 1 ¼ hole saw.
After tidying the hole place your washer over the hole and the end cap on top of this. Put the bulkhead fitting on the end cap and then a washer on the underneath side of the grow bed. Add the nut and tighten it all up properly.
It’s a good idea to put a 90° elbow on the bottom of the valve now to increase the Bell siphon effect; it may loosen the top nut you’ve just done so retighten it afterward.
You can tighten it afterward with water pliers.
Now add a small section of pipe and another 90° elbow to the elbow under the grow bed. This will ensure the water is hitting the fish tank exactly where you want it to without any risk of it going over the side.
The next step is to screw the standpipe in place inside the grow bed; it screws straight into the bulkhead fitting. The valve and the shroud sit easily over the top.
Before moving onto the grow media you should give this a wet run. You want to make sure there are no leaks!
Step 6 –Grow Media
Having chosen the grow media, you can now place it into a sieve to ensure it is clean. If you don’t have a sieve you can make one with some netting and a wheelbarrow. Once you flushed it through two or three times you’ll be able to scoop it straight into the grow bed.
With this is in place you’ll be ready to turn your pump on again. Despite having cleaned the system you’ll almost certainly find that the water is cloudy.
You’ll need to leave it for a few days for this to dissipate. This is important as it is doing more than just letting the water settle and become clear. If you’ve used tap water there will be chlorine and other chemicals in it. These can be harmful to your fish; allowing the water to settle will ensure these chemicals have gone.
Step 7 – Bacteria
It is essential that you have bacteria in your water; these facilitate the process of converting fish waste into nitrates that the plants can utilize.
Without the bacteria, the plants will not have the food they need. If they aren’t fed then the water will not be cleaned and the fish will die.
To start this process off you’ll need to add fish to your tank. At this stage, just a few fish will do. They will produce the waste that is needed to trigger the arrival of bacteria.
This is actually a complex process. Fish produce ammonia waste; if this is left in the water it will kill them. However, plants cannot consume ammonia. Fortunately, the ammonia attracts Nitrosomonas which are bacteria that convert the ammonia into nitrites.
This then attracts the bacteria nitrospira; which converts the nitrites into nitrates; which is great for your plants to consume.
Adding fish will start the ammonia cycle but you must test first to ensure the pH is appropriate for your fish; usually between 7 and 7.5 depending on the fish, you wish to keep.
It is possible for the water to cycle by itself; you’ll see the changes in it through your daily testing. However, adding just a couple of fish will speed this process up. It is important to keep the fish quantity small; you may even consider these sacrificial fish.
You can start the bacterial cycle by adding ammonia yourself which can save time. This will go beyond the scope of this tutorial but is discussed in my book.
Step 8 – Adding Plants & Fish
Once you know the chemical levels of the water are correct you can add more fish. This means checking the ammonia, nitrates and pH.
You can also start planting. If you are using plants that have been in soil you’ll need to make sure that the plant and roots are washed completely; you don’t want contaminants entering your water system.
It is normal for the plants to droop a little and even to start turning yellow. This is the shock of entering a new system. It will only last a few days and you should see new leaves growing within a few weeks.
The most important element that you need to be doing during this stage is to continue to monitor the pH levels, ammonia, nitrates, and even the nitrites. This will help to ensure you have the right environment for your plants and fish; allowing your crops to grow and your fish to breed.
Flow Rate
Perhaps the biggest hurdle you’ll face in your new setup is whether the flow rate is right or not. By using an oversized pump you’ll be able to direct some of the water back into the fish tank as a spray; adding precious oxygen without the need for a separate air pump.
The water from the fish tank needs to go through the grow bed media at least once every hour. But, it should never come over the top of your grow bed. If it is then the flow is too high for the Bell siphon; simply open the valve in your fish tank to reduce the flow onto your grow bed.
The final step is to monitor daily and learn as you enjoy the experience of growing your own plants and breeding fish; almost effortlessly.
That’s it! I hope you learned something here. If you have questions, shoot me an email or leave a comment.
I have written a book that contains all the information you need to get started with aquaponics.
Don’t be the person that makes painful mistakes during your first aquaponics build!
It has 265 pages filled with information about aquaponics. It’s available in paperback or eBook format.
You can buy it here on Amazon.com

Nick loves building, managing and giving others advice on aquaponics. He created this website to do just that. He is the author of Aquaponics for beginners. If you got a question contact him here or read more on the about page here.